|
July 8, 2002
Artifact 2-6-S-45
| Secrets of the Knob |
 The
Seven Site is the place on Nikumaroro where Earhart may have lived and
died as a castaway. Ironically, the smallest metal artifact recovered
from that site during the Niku III expedition (August/September 2001)
has been the object of the most intense research and is providing us with
a real nail-biter of a drama as we close in on its identification.
The
Seven Site is the place on Nikumaroro where Earhart may have lived and
died as a castaway. Ironically, the smallest metal artifact recovered
from that site during the Niku III expedition (August/September 2001)
has been the object of the most intense research and is providing us with
a real nail-biter of a drama as we close in on its identification.
When initially found, the artifact was thought to be a small metal cap for a container of some kind. Closer inspection, however, revealed an absence of threading and the presence of damage around the central hole which made it clear that the object had once been attached to a shaft. Knurling around the edges completed the impression that what we have is a knob which originally turned a shaft which, in turn, performed some function on an instrument or device. We were also pleased to see that there are raised symbols cast into the face of the object which, once deciphered, might provide a clue to the identity of the device it was once a part of.
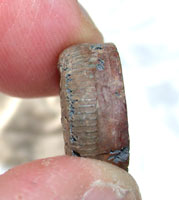
 Unfortunately,
the figures on the face of the knob were illegible due to “insults”
to the surface and a build up of what is probably corrosion product. As
a first step in trying to coax the knob into revealing its secrets we recruited
the help of the Nondestructive Testing Laboratory at the United States Naval
Academy in Annapolis, MD. The scientists there examined the knob using a
Scanning Electron Microscope but the powerful magnification did not make
it any easier to read the figures cast into the face. The SEM did, however,
determine that the knob was made of lead with a steel reinforcing collar
inside. That was surprising. We expected the exterior surface to be brass,
aluminum, or even “pot metal” (a cheap alloy), but not lead.
The soft lead surface did, at least, explain why the cast figures had been
so easily damaged. To
make the symbols more legible the Naval Academy lab removed some of the
obscuring buildup with ultrasound in plain water. That helped some, but
the symbols could still not be reliably deciphered.
Unfortunately,
the figures on the face of the knob were illegible due to “insults”
to the surface and a build up of what is probably corrosion product. As
a first step in trying to coax the knob into revealing its secrets we recruited
the help of the Nondestructive Testing Laboratory at the United States Naval
Academy in Annapolis, MD. The scientists there examined the knob using a
Scanning Electron Microscope but the powerful magnification did not make
it any easier to read the figures cast into the face. The SEM did, however,
determine that the knob was made of lead with a steel reinforcing collar
inside. That was surprising. We expected the exterior surface to be brass,
aluminum, or even “pot metal” (a cheap alloy), but not lead.
The soft lead surface did, at least, explain why the cast figures had been
so easily damaged. To
make the symbols more legible the Naval Academy lab removed some of the
obscuring buildup with ultrasound in plain water. That helped some, but
the symbols could still not be reliably deciphered. 
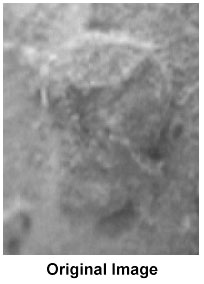
This is an analysis of a photomicrograph of symbol #1 on TIGHAR artifact 2-6-S-45, commonly known as “the knob.” The photograph is visually degraded because of the JPEG format which is used to enable email transmission.
This analysis contains 5 copies of the identical image which are separately annotated. Symbol #1 was chosen as the subject of the first photomicrograph because its value is substantively obvious, which makes it a suitable test subject.
 Annotated
Image #1: Original Image. This is the original unannotated image.
Annotated
Image #1: Original Image. This is the original unannotated image.
Photo courtesy Jeff Glickman, Photek Imaging.
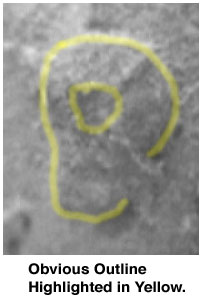 Annotated
Image #2: Obvious Outline Highlighted in Yellow. The yellow overlay
highlights the outline of the symbol. “Obvious” means that a
distinct change in height is observed in these locations. This is most
easily seen dynamically while focusing the microscope, but is also recorded
in a 2 dimensional photomicrograph as a change in brightness denoting
a portion of the symbol casting a shadow onto the metal beneath.
Annotated
Image #2: Obvious Outline Highlighted in Yellow. The yellow overlay
highlights the outline of the symbol. “Obvious” means that a
distinct change in height is observed in these locations. This is most
easily seen dynamically while focusing the microscope, but is also recorded
in a 2 dimensional photomicrograph as a change in brightness denoting
a portion of the symbol casting a shadow onto the metal beneath.
Photo courtesy Jeff Glickman, Photek Imaging.
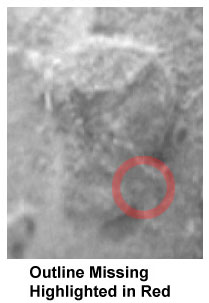 Annotated
Image #3: Outline Missing Highlighted in Red. The red overlay shows
a section of the symbol where the outline is missing. This creates a minor
ambiguity in interpreting the symbol. At this point the two candidates
derived from Image #2 are “R” and “P”.
Annotated
Image #3: Outline Missing Highlighted in Red. The red overlay shows
a section of the symbol where the outline is missing. This creates a minor
ambiguity in interpreting the symbol. At this point the two candidates
derived from Image #2 are “R” and “P”.
Photo courtesy Jeff Glickman, Photek Imaging.
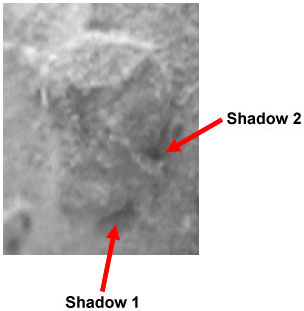 Annotated
Image #4: Shadow #1 & Shadow #2. This image shows the last portion
of shadow #1 oriented in the vertical direction, and the last portion
of shadow #2 oriented in the horizontal direction. Note the width of metal
used throughout the symbol. Compare this with the width of the metal located
between the two shadows. This width is narrower, and therefore inconsistent
with, the width of the metal used throughout the rest of the symbol. This
effectively eliminates “R” as a possible value for the symbol.
Note: the section of missing outline appears to coincide with either a
record of an insult to 2-6-S-45 or a mold line (located diagonally across
symbol from upper left to lower right).
Annotated
Image #4: Shadow #1 & Shadow #2. This image shows the last portion
of shadow #1 oriented in the vertical direction, and the last portion
of shadow #2 oriented in the horizontal direction. Note the width of metal
used throughout the symbol. Compare this with the width of the metal located
between the two shadows. This width is narrower, and therefore inconsistent
with, the width of the metal used throughout the rest of the symbol. This
effectively eliminates “R” as a possible value for the symbol.
Note: the section of missing outline appears to coincide with either a
record of an insult to 2-6-S-45 or a mold line (located diagonally across
symbol from upper left to lower right).
Photo courtesy Jeff Glickman, Photek Imaging.
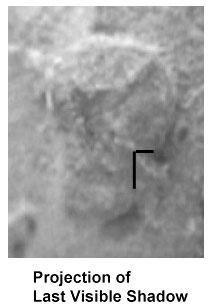 Annotated
Image #5: Projection of Last Visible Shadow. The last visible portion
of shadow #1 is projected in the direction of its orientation (vertically),
and the last visible portion of shadow #2 is projected in the direction
of its orientation (horizontal). This effectively demonstrates that the
most likely conclusion for Symbol #1 is that it is a “P.”
Annotated
Image #5: Projection of Last Visible Shadow. The last visible portion
of shadow #1 is projected in the direction of its orientation (vertically),
and the last visible portion of shadow #2 is projected in the direction
of its orientation (horizontal). This effectively demonstrates that the
most likely conclusion for Symbol #1 is that it is a “P.”
Photo courtesy Jeff Glickman, Photek Imaging.
Conclusion: TIGHAR artifact 2-6-S-45 symbol #1 has a high likelihood of being a “P.”
Symbols #2 through #11 and Symbol #19 were similarly analyzed with the final results as shown below. In the next installment we’ll begin deciphering the patent number itself.
Photos courtesy Jeff Glickman, Photek Imaging.

| P1 | A2 | T3 | E4 | N5 | T6 | E7 | D8 | :9 | N10 | O11 | .19 |
| Symbols #1-11, 19 | Symbol #12 | Symbol #13 | Symbol #14 |
| Symbol #15 | Symbol #16 | Symbol #17 | Symbol #18 |
 Imager:
Custom CCD on Celestron Microscope.
Imager:
Custom CCD on Celestron Microscope.